I used just over a 50 g of a 100% cotton skein (Drops Paris - col. 35 vanilla, 39 pistachio, 43 green, and 5 mm hook) to make a single pot-holder. You may wish to explore this pattern by playing with colours, e.g. single, double or treble. I like this pattern very much as it is very easy to follow and very quick! Especially, if you do not have much time and budget, but you would like to make a small gift for your family or friends. Two-colour pot-holders are slightly larger as I have done one row more, comparing with a 3-colour one.
Only the basic crochet skills are required, i.e., to make a chain, a slip stitch and single crochet (double crochet - UK). You start with crocheting a chain of 18 stitches (or more, this depends on you how large would you like the hook to be), then slip stitch to join the ends of the chain. Then you use single crochet stitch (double crochet - UK) all around the chain to strengthen the hook and slip stitch to finish this round. Chain 1, 1 single crochet (double crochet - UK) in following 5 stitches from a previous row, 3 single crochet in 1 stitch, then again 5 single crochet in the next 5 stitches.

To begin next row, turn your work, chain 1. In the same stitch 1 single crochet, then 1 single crochet in the next 5 stitches, 3 single crochet in 1 stitch, then 6 single crochet in following stitches. Repeat this pattern. Every next row becomes longer of a 1 stitch at two sides of the square. Continue, until you reach your chosen width (=height) of your pot-holder. In my case, the final row (before adding a border also consisted of single crochet) counted 35 stitches on my side (2-colour pot-holder) and 34 stitches (3-colour pot-holder).
After adding a border, the final measurements were following: (a) 2-colour - 8.5 in (22 cm) x 7 in (17.5 cm); (b) 3-colour - 8 in (20 cm) x 6.5 in (16 cm).
TIP: Later on, I modified the beginning by making a magic circle instead of making a chain. This way you will avoid a small bump present on the pot-holder on the left. It is a small tip, but the pot-holder becomes more pretty.
***
***
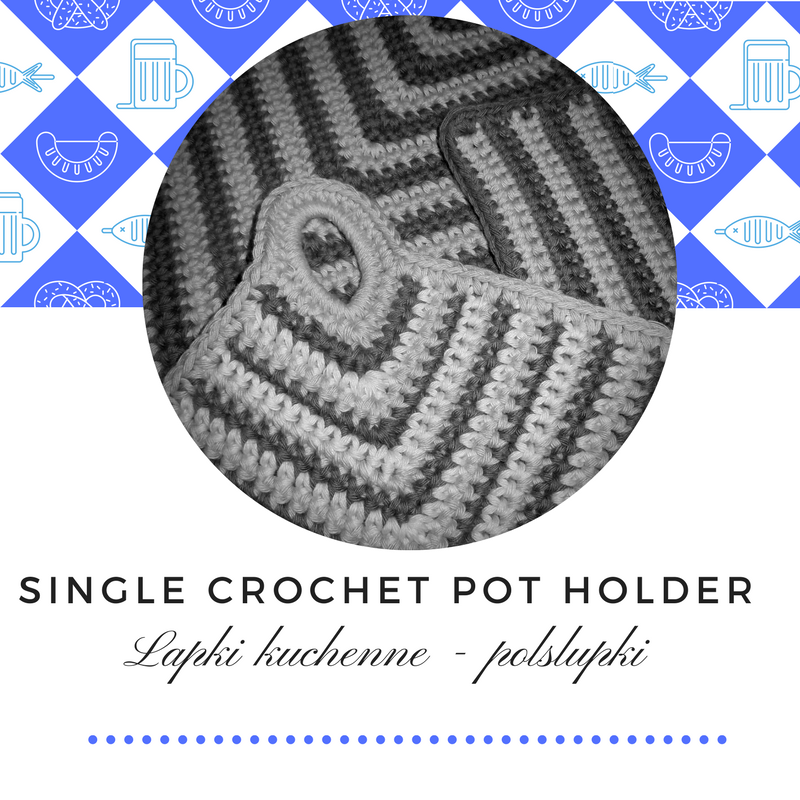
Korzystając w dalszym ciągu z pozostałej bawełnianej włóczki zdecydowałam się zrobić inny rodzaj ściereczek. I proszę oto one, czyż nie są śliczne? Filmik instruktażowy w języku angielskim można znaleźć tutaj. Ten sam filmik jest również dostępny w języku niemieckim a także w języku polskim.
Zużyłam nieco ponad 50 g 100% bawełnianej włóczki (Drops Paris - kol. 35 vanilla, 39 pistachio, 43 green, oraz szydełko 5 mm), w celu wykonania pojedynczej łapki do garnka. W zależności od preferencji, wzór ten można wykonać bawiąc się kolorami, jednym, dwoma, czy trzema. Bardzo podoba mi się ten wzór, tym bardziej, że jest bardzo prosty i naprawdę szybko się go dzierga. Świetnie nadaje się na drobny upominek dla rodziny czy przyjaciół. Dwukolorowe ściereczki, które wykonałam, są nieco większe od tych trójkolorowych, ponieważ wykonałam jeden rząd więcej.
Wzór wymaga znajomości podstawowych ściegów, tj. łańcuszka, oczka ścisłego, półsłupka. Robótkę rozpoczyna się od wykonania łańcuszka z 18 oczek (lub więcej, zależy od tego jak duży ma być uchwyt ściereczki), potem oczkiem ścisłym łączymy dwa końce łańcuszka i zamykamy kółko. Następnie należy wykonać półsłupki dookoła łańcuszka, tak, aby go wzmocnić, oczkiem ścisłym zamykamy ten rząd. Jedno oczko łańcuszka, jeden półsłupek w kolejnych 5-ciu półsłupkach z poprzedniego rzędu, 3 półsłupki w jednym ściegu, ponownie 5 półsłupków w kolejnych 5-ciu półsłupkach z poprzedniego rzędu.
W celu rozpoczęcia nowego rzędu, odwróć robótkę, jedno oczko łańcuszka. W tym samym miejscu należy zrobić jeden półsłupek, potem po jednym półsłupku w kolejnych 5-ciu ściegach, potem 3 półsłupki w jednym ściegu, potem po jednym w kolejnych 6-ciu ściegach. Powtrzaj ten wzór. W każdym kolejnym rzędzie przybywa po jednym półsłupku z obu stron kwadratu. Kontynuuj, aż osiągniesz wybraną szerokość (=wysokość) łapki do garnka. W moim przypadku, końcowy rząd (zanim dodałam brzeg) składał się z 35-ciu ściegów (ściereczka dwukolorowa), i z 34-ch ściegów (ściereczka trójkolorowa). Brzeg złożony był również z półsłupków wykonanych dookoła ściereczki.
Po dodaniu brzegu, końcowe wymiary ściereczki były następujące: (a) dwukolorowe - 22 x 17,5 cm (8,5 x 7 cali); (b) trójkolorowe - 20 x 16 cm (8 x 6,5 cali).
PORADA: Później, zmodyfikowałam początek robótki poprzez wykonanie "magicznego kółeczka" zamiast łańcuszka. W ten sposób można uniknąć małe zgrubienie widoczne na ściereczce z lewej strony. Porada jest nieznaczna, niemniej poprawia wygląd łapki.
Comments
Post a Comment